There is no doubt that AWS is still a hot topic in 2019 so I felt that I should write something useful to get started with exploring it’s capabilities. In this tutorial I’ll show you how to deploy a simple Spring Boot application which uses a MySQL database to AWS using Elastic Beanstalk.
The application
We’ll create a very simplistic web service which exposes some HTTP endpoints to interact with the system. Imagine that we want to store books and retrieve the book information. Obviously there is a need for some storage which could be a simple H2 if Spring Boot is already on the table but as this is a tutorial about a let’s say “full stack” service, we are going to use an external database, namely MySQL. On start.spring.io, create a new project using Web, JPA, MySQL.
For database access I’ll use Spring Data JPA and Hibernate. The model is quite simple, just an id and a name for the books:
@Entity
@Table(name = "books")
public class Book {
    @Id
    private UUID id;

    private String name;

    private Book() {
    }

    public Book(String name) {
        this.id = UUID.randomUUID();
        this.name = name;
    }

    // getters/setters omitted
}
The repository is a Spring Data JPA repository, nothing special:
public interface BookRepository extends JpaRepository<Book, UUID> {
}
The 2 endpoints are the following:
- GET /books – lists all the books in the system
- POST /books – stores a book
- The JSON structure which the endpoint will accept is: { “name”: “test-book” }
@RestController
@RequestMapping("/books")
public class BookController {
    private final BookRepository repository;

    public BookController(BookRepository repository) {
        this.repository = repository;
    }

    @GetMapping
    public Collectio<BookView> get() {
        return repository.findAll().stream().map(BookView::new).collect(toList());
    }

    @PostMapping
    public ResponseEntity post(@RequestBody CreateBookRequest request) {
        repository.save(new Book(request.getName()));
        return ResponseEntity.ok().build();
    }
}
Okay, I don’t want to overexplain things here. One method for the GET endpoint which uses the BookView POJO containing the id and name attributes and the other method is for the POST endpoint which practically just creates an entity out of the request body.
Now the configuration for the app. I’m using YAML format here because it’s just more convenient for me, src/main/resources/application.yml :
server:
  port: 8080

spring:
  datasource:
    url: jdbc:mysql://${MYSQL_HOST:localhost}:${MYSQL_PORT:3306}/${MYSQL_DB:aws_eb_db}
    username: ${MYSQL_USERNAME:root}
    password: ${MYSQL_PASSWORD:root}
  jpa:
    hibernate:
      ddl-auto: create
    properties:
      hibernate:
        dialect: org.hibernate.dialect.MySQL8Dialect
As you can see, I’ve set all the database related configuration to be configurable. I’m using the ${ENV_VAR:[default_value]} notation where it’s possible to inject values from environment variables to the configuration and I’ve provided some defaults for easier testing locally… because of course we’ll start up the application before deploying to AWS. 🙂
The default credential for the database is root:root and the URL is localhost:3306. The default database the application is connecting to is aws_eb_db.
Bringing up the tool of 2018, Docker. If you have a standalone MySQL setup locally already, you can skip this, but let’s check how to fire up a brand new MySQL server in Docker for testing the application. I’m going to use MySQL 8.0.11 because that’s the newest MySQL server available in AWS at the time of writing this article.
$ docker run --name aws-eb-mysql -e MYSQL_ROOT_PASSWORD=root -p 3306:3306 -d mysql:8.0.11
After this, hopefully your container is running properly. Now the database has to be created before starting the application. We’ll use MySQL CLI for this purpose within the container:
$ docker exec -it aws-eb-mysql bash
This should bring up a bash terminal for you. Let’s login to the server:
root@dc6102791ddd:/# mysql -uroot -proot
mysql: [Warning] Using a password on the command line interface can be insecure.
Welcome to the MySQL monitor.  Commands end with ; or \g.
Your MySQL connection id is 8
Server version: 8.0.11 MySQL Community Server - GPL

Copyright (c) 2000, 2018, Oracle and/or its affiliates. All rights reserved.

Oracle is a registered trademark of Oracle Corporation and/or its
affiliates. Other names may be trademarks of their respective
owners.

Type 'help;' or '\h' for help. Type '\c' to clear the current input statement.

mysql>
Now the new database for our application:
mysql> CREATE DATABASE aws_eb_db;
Query OK, 1 row affected (0.03 sec)
Great, we are all set. Spin up the application using the Boot plugin (I’ve created a Gradle project here):
./gradlew clean bootRun
The app should start up correctly if everything is configured properly. Testing the endpoints is easy, if you are a CLI type of guy, use curl, if not, open your favorite REST client (e.g. Postman).
$ curl http://localhost:8080/books
[]
$ curl http://localhost:8080/books -H "Content-Type: application/json" -d "{ \"name\" : \"test-book\"}"
$ curl http://localhost:8080/books
[{"id":"972634d5-8a89-4c68-b94d-9be74a00c414","name":"test-book"}]
Cool, the application is ready. Package it using ./gradlew clean build and the executable JAR can be found under the build/libs/ folder.
Quick AWS rampup
I won’t do a deep dive here about AWS, only an overall view. For a simple application with database access, 2 AWS services can be used for deploying the application. One of them is EC2 (Elastic Compute Cloud) which is straight up just a virtual machine. You can choose between different AMIs (Amazone Machine Image) which translates to – “which operating system image”. It can be an Amazon specific Linux, Ubuntu, Windows, etc. This is where the application package (JAR) will be put and started. Note that the services which we’ll be using in this tutorial are eligible for the free-tier on AWS.
The second service is Amazon RDS (Relational Database Service). As the name suggests, it is a relational database service. There are several database types available, we’ll use MySQL for the purpose of this tutorial but PostgreSQL, Oracle, etc. are also available. The database used by the application will reside here and the application running on the EC2 instance will access the database provided by the RDS service.
It’s not that hard to understand there is an overhead every time you want to create a test bench for a simple service with database access because you have to set up the EC2 instance, the database, the security groups, VPC, optionally load balancing and auto scaling. Amazon came up with a great idea to compose these things together into a new service called Amazon Elastic Beanstalk.
Elastic Beanstalk (EB) is a service to easily deploy an application with the usual needs, EC2 instances where the app will run, database, scaling, load balancing, etc. EB is really just a composition of the already existing Amazon services. Here’s a very simplified picture how the application will look like in an EB environment.

Using Elastic Beanstalk for deployment
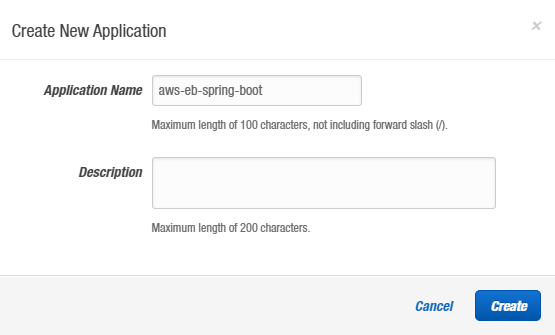
First of all, login to AWS, then select the Elastic Beanstalk service under the Compute category. Then create a new application:
After the application has been created, you will have the environments page in front of you. Elastic Beanstalk support multiple environments for a single application. Imagine like you want to have a development environment, a staging environment, a test environment and so on. With EB, you can do that, although it’s not necessarily a good idea to run a production grade application because as any abstraction, EB also comes with a cost. It is very powerful but when you want to customize your application down to the last tiny bit, you’ll find yourself in problems with EB. For production, rather use native EC2 and RDS setup.

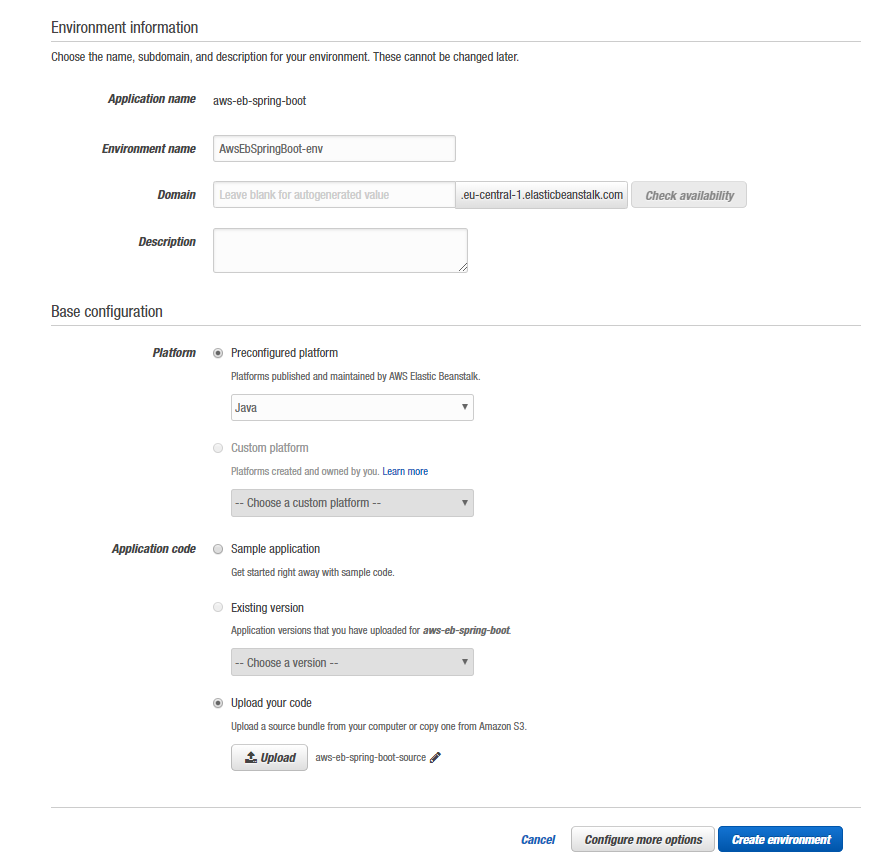
Create a new environment and select Web server environment. The only thing we need to configure is the Platform. Select Java there from the dropdown and upload the application JAR which we’ve created. Click on Configure more options next to the Save button.
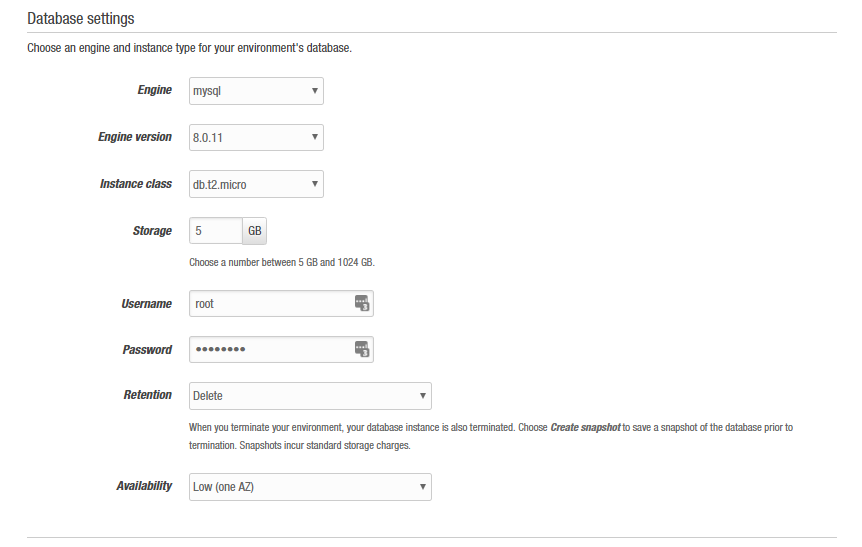
Now the detailed configuration is available. Start with adding a new database. Click on Modify under the Database category. Select mysql 8.0.11, db.t2.micro instance is enough for now and it’s free. Provide a username and password with which you want to access the database.
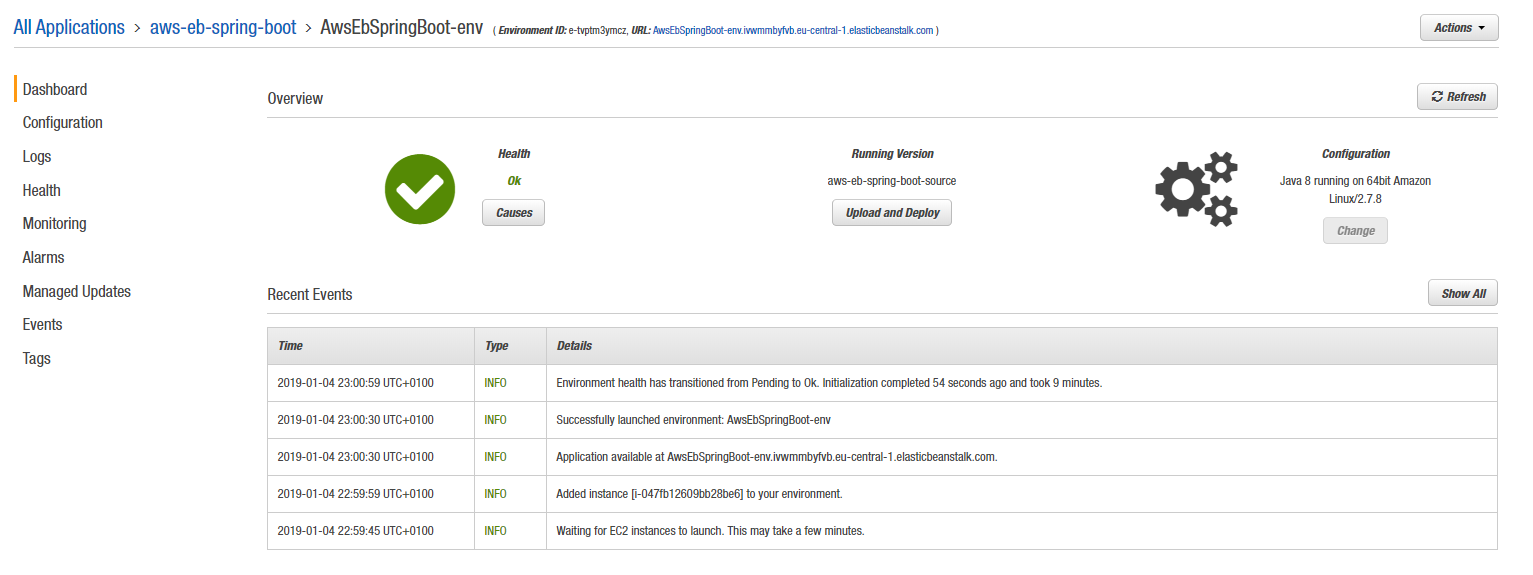
Click on Create environment. It takes ~10-15 mins to create everything but after it’s done, the app won’t be accessible yet, more configuration is needed but first we need the running database to set the host (which is auto-generated) for the application.
After a successful environment creation, you should see a similar picture:
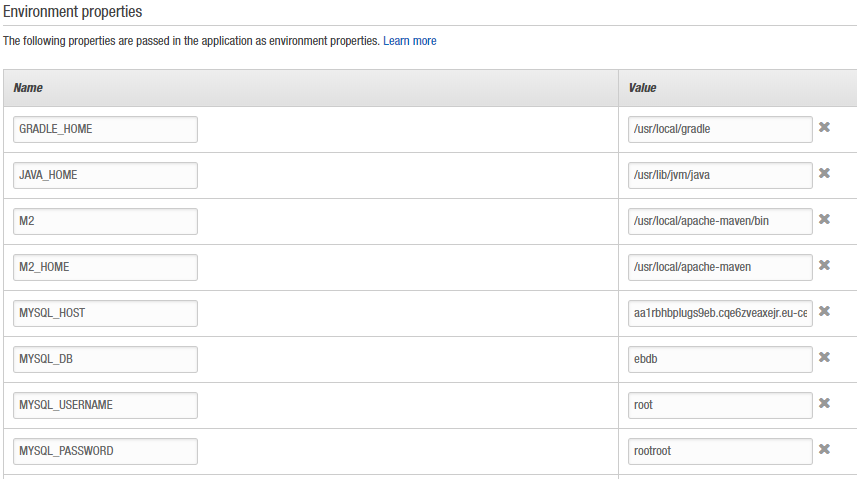
The next step is to set up the connection between the app and the RDS. Go to Configuration and check the database details, there is an endpoint by which you can access the database. Copy that link and go to the Software category and click on Modify, that’s where the environment variables can be added.
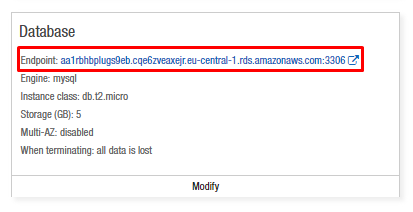
Add the following values:
- MYSQL_HOST=[the endpoint of the database without the port]
- MYSQL_DB=ebdb (this is a fix value for EB databases)
- MYSQL_USER=[the username you provided]
- MYSQL_PASSWORD=[the password you provided]
The application should have established the connection to the database. Let’s expose port 8080 on the environment to access the API. The reason why I didn’t use port 80 because the web environment in EB puts an NGINX to the running EC2 instance which already takes port 80. Of course it’s possible to remove that but that would just complicate things.
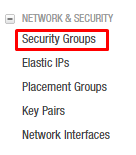
Open up the EC2 service and select Security Groups (SG).
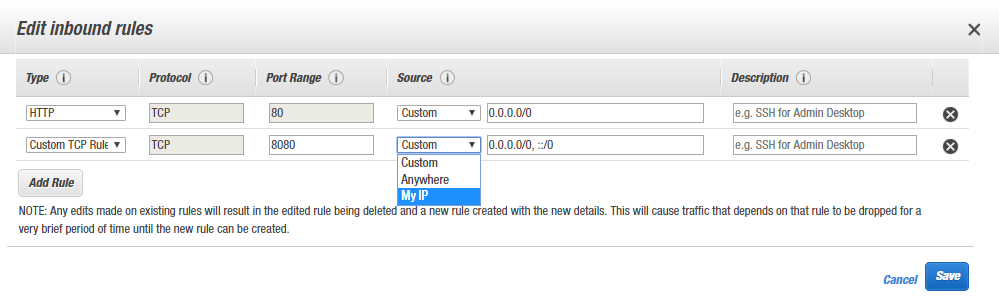
Select the SG in the list which is bound to the EC2 instance (by default it has a description of SecurityGroup for ElasticBeanstalk environment). In the bottom, select the Inbound tab so we can customize which ports are exposed on the instance. Click on Edit and add a new rule. Make it a Custom TCP Rule and set port 8080. For Source, you can set 0.0.0.0/0 which translates to anyone can access port 8080 or you can select the My IP from the list so only you can access it.
That was the configuration. Go back to Elastic Beanstalk and select your application and environment. On top of the page, you should have a URL, something like this: AwsEbSpringBoot-env.ivwmmbyfvb.eu-central-1.elasticbeanstalk.com
This is the URL where you can access the application so bring up your REST client or terminal and test the app, don’t forget that you need to specify port 8080 in the URL. I’m going to use cURL here.
$ curl http://awsebspringboot-env.ivwmmbyfvb.eu-central-1.elasticbeanstalk.com:8080/books
[]
Getting the list of books works correctly. Let’s try adding one:
$ curl http://awsebspringboot-env.ivwmmbyfvb.eu-central-1.elasticbeanstalk.com:8080/books -H "Content-Type: application/json" -d "{ \"name\": \"test-book\" }"
Fetching the books again will result in the following response:
$ curl http://awsebspringboot-env.ivwmmbyfvb.eu-central-1.elasticbeanstalk.com:8080/books
[{"id":"116edc3b-0b92-49b5-a6ae-f60b3db7858b","name":"test-book"}]
That’s it. Easy, right?
Conclusion
Elastic Beanstalk is a great tool to quickly deploy applications into the cloud, only minor configuration is needed for a Spring Boot application with database access. On top of the setup I’ve showed, you can customize the application even more with auto scaling, monitoring, rolling updates, and so much more. Also note that I’ve used the Web UI for doing the deployment but all of this is available through the CLI of EB so you can simply automate this process.
The application code can be found on GitHub. If you liked the article, give it a thumbs up and share it. If you are interested in more, make sure you follow me on Twitter.
Amazon RDS, even if you do not do anything with it, it costs around $250 per month, what free tier are we talking about here? If you want the truly free tier, deploy 2 docker containers one with the spring boot app and one with mysql server. Do not go for the RDS!