I was always curious if there’s any way to use Spring Boot in the serverless world. I started digging deeper into the area and I came to the conclusion that it’s very possible. I guess my question unconsciously was not only if there’s a possibility to use Spring but whether it’s worth to use it,
In this article I’m going to go into how much extra latency does using Spring Boot add into the overall execution of a minimalistic function. For the tests I’m gonna be using AWS Lambda with a Java runtime.
I think deciding if Spring Boot is worth using is not black or white. You always have to put measurement results into perspective. For reference, I’m going to use a plain Java lambda function. And for the actual test, I’ll create a Spring Boot version too, both fulfilling the same functionality.
Architecture
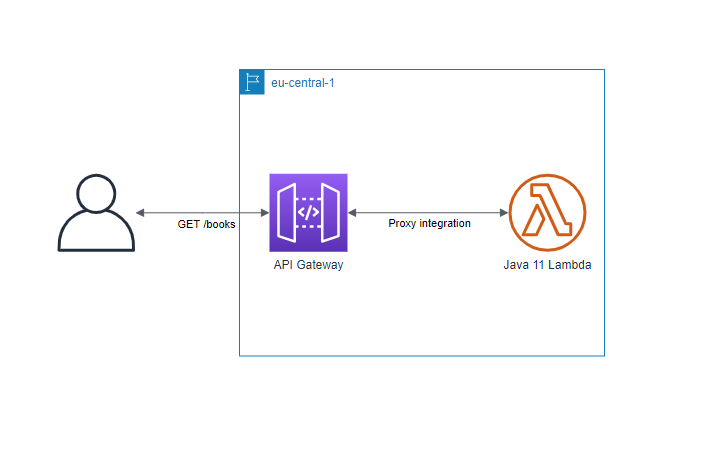
I’ll keep the architecture very simple. There’s gonna be a lambda function with Java 11 runtime serving the API, and it’s going to be exposed via an HTTP AWS API Gateway. For the sake of the test, I’ll have a single API, /books
With this architecture in mind, we can easily measure how much latency gets added when Spring Boot is used for a serverless function because we don’t have any other intervening factors like databases, external services, and so on.
Plain Java function
I’ll jump right into coding. The Java function is going to be the simplest ever. First of all we’ll need the domain class, Book
public class Book {
    private int id;
    private String name;

    public Book(int id, String name) {
        this.id = id;
        this.name = name;
    }

    // getters & setters omitted
}
Then, I’ll have a wrapper for the API Gateway proxy integration response, according to the docs.
public class ApiGatewayProxyResponse {
    private int statusCode;
    private Map<String, String> headers;
    private String body;

    public ApiGatewayProxyResponse(int statusCode, Map<String, String> headers, String body) {
        this.statusCode = statusCode;
        this.headers = headers;
        this.body = body;
    }

    // getters & setters omitted
}
And the last piece is to create a handler that AWS will invoke upon an API request.
public class LambdaHandler implements RequestHandler<Map<String, Object>, ApiGatewayProxyResponse> {
    private static Gson gson = new Gson();

    private Map<Integer, Book> bookMap = new HashMap<>();

    public LambdaHandler() {
        bookMap.put(1, new Book(1, "Effective Java"));
        bookMap.put(2, new Book(2, "Running Spring in Serverless"));
    }

    @Override
    public ApiGatewayProxyResponse handleRequest(Map<String, Object> input, Context context) {
        return new ApiGatewayProxyResponse(200, null, gson.toJson(bookMap.values()));
    }
}
There are 2 things happening in the handler’s code. One is, we’re creating a map of Books that will be returned in the response. And in the handleRequest method, the ApiGatewayProxyResponse is being returned with HTTP 200 and the respective Books.
Spring Boot function
Now on the other hand, let’s look at the code for the Spring Boot lambda function.
On top of the Book domain object seen previously, I’ll have the usual main class for a Spring application:
@Configuration
@EnableAutoConfiguration
@Import({BookController.class})
public class AwsLambdaSpringBoot2Application {
	public static void main(String[] args) {
		SpringApplication.run(AwsLambdaSpringBoot2Application.class, args);
	}
}
The only change I’ve made is replacing the @SpringBootApplication annotation with the @Configuration and @EnableAutoConfiguration annotations to avoid automatic component scanning. This can speed up the startup time of the lambda function especially if you have a lot of components. Instead of the scan, I’ve used the @Import annotation to specifically tell Spring which component I want it to load.
Since this is going to serve a REST API, I’ll have a controller class that maps to the /books API.
@RestController
public class BookController implements InitializingBean {
    private Map<Integer, Book> bookMap = new HashMap<>();

    @Override
    public void afterPropertiesSet() throws Exception {
        bookMap.put(1, new Book(1, "Effective Java"));
        bookMap.put(2, new Book(2, "Running Spring in Serverless"));
    }

    @RequestMapping("/books")
    public Collection<Book> getBooks() {
        return bookMap.values();
    }
}
Nothing special, same setup as for the plain Java version with the addition of the Spring annotations.
And here’s the magic, to wire this all together into an API Gateway Lambda integration. AWS was kind enough to prepare a package that does exactly that for Spring Boot 2 called aws-serverless-java-container-springboot2.
I’m importing it to the project – I’m using Gradle:
dependencies {
    implementation 'org.springframework.boot:spring-boot-starter-web'
    implementation 'com.amazonaws.serverless:aws-serverless-java-container-springboot2:1.5.2'
    implementation 'io.symphonia:lambda-logging:1.0.1'
    testImplementation 'org.springframework.boot:spring-boot-starter-test'
}
If we’re already at the Gradle build, let’s just get rid of the embedded tomcat Spring Boot is shipped with to reduce the size of the JAR we’re going to produce:
task buildZip(type: Zip) {
    from compileJava
    from processResources
    into('lib') {
        from(configurations.compileClasspath) {
            exclude 'tomcat-embed-*'
        }
    }
}

build.dependsOn buildZip
And here’s the full Gradle build:
plugins {
    id 'org.springframework.boot' version '2.4.3'
    id 'io.spring.dependency-management' version '1.0.11.RELEASE'
    id "com.github.johnrengelman.shadow" version "6.1.0"
    id 'java'
}

dependencies {
    implementation 'org.springframework.boot:spring-boot-starter-web'
    implementation 'com.amazonaws.serverless:aws-serverless-java-container-springboot2:1.5.2'
    implementation 'io.symphonia:lambda-logging:1.0.1'
    testImplementation 'org.springframework.boot:spring-boot-starter-test'
}

test {
    useJUnitPlatform()
}

task buildZip(type: Zip) {
    from compileJava
    from processResources
    into('lib') {
        from(configurations.compileClasspath) {
            exclude 'tomcat-embed-*'
        }
    }
}

build.dependsOn buildZip
Now. Going back to coding. We still need a bridge for the lambda invocation to be mapped onto a Spring Boot API request. Using the package AWS has given, let’s create a lambda handler:
public class LambdaHandler implements RequestStreamHandler {
    private static SpringBootLambdaContainerHandler<AwsProxyRequest, AwsProxyResponse> handler;

    static {
        try {
            handler = SpringBootLambdaContainerHandler.getAwsProxyHandler(AwsLambdaSpringBoot2Application.class);
        } catch (ContainerInitializationException e) {
            e.printStackTrace();
            throw new RuntimeException("Could not initialize Spring Boot application", e);
        }
    }

    @Override
    public void handleRequest(InputStream inputStream, OutputStream outputStream, Context context)
            throws IOException {
        handler.proxyStream(inputStream, outputStream, context);
    }
}
The crucial piece we have to use from this library is this: SpringBootLambdaContainerHandler.getAwsProxyHandler(AwsLambdaSpringBoot2Application.class)
This is how you can build up a Spring context in a way that the AWS API Gateway proxy integrations will be transformed into Spring handled API requests.
Also, there’s another trick. Using a static variable for storing the reference to the built-up Spring context. It’s intentional. It’s the solution to cache data between your lambda invocations for the same lambda environment. From a practical standpoint, it means that when the lambda function receives its first invocation, the Spring context will be built-up, and subsequent invocations for that particular lambda instance will use the already built-up context until the lambda environment is killed by AWS.
Deploying
That was the coding part. Let’s look at the deployment. Obviously you can pull this together from the AWS console manually, but I’ll be a little more sophisticated here and get a CloudFormation template with all the necessary resources:
AWSTemplateFormatVersion: 2010-09-09
Description: Using Spring Boot in Lambda example

Parameters:
  apiGatewayStageName:
    Type: String
    Default: dev
  apiGatewayName:
    Type: String
  functionName:
    Type: String
  functionHandler:
    Type: String
  s3BucketKey:
    Type: String


Resources:
  apiGateway:
    Type: AWS::ApiGateway::RestApi
    Properties:
      Description: Example API Gateway
      EndpointConfiguration:
        Types:
          - REGIONAL
      Name: !Ref apiGatewayName

  booksResource:
    Type: AWS::ApiGateway::Resource
    Properties:
      RestApiId: !Ref apiGateway
      ParentId: !GetAtt apiGateway.RootResourceId
      PathPart: 'books'
  booksGetMethod:
    Type: AWS::ApiGateway::Method
    Properties:
      AuthorizationType: NONE
      HttpMethod: GET
      Integration:
        IntegrationHttpMethod: POST
        Type: AWS_PROXY
        Uri: !Sub
          - arn:aws:apigateway:${AWS::Region}:lambda:path/2015-03-31/functions/${lambdaArn}/invocations
          - lambdaArn: !GetAtt lambdaFunction.Arn
      ResourceId: !Ref booksResource
      RestApiId: !Ref apiGateway

  apiGatewayDeployment:
    Type: AWS::ApiGateway::Deployment
    DependsOn:
      - booksGetMethod
    Properties:
      RestApiId: !Ref apiGateway
      StageName: !Ref apiGatewayStageName

  lambdaFunction:
    Type: AWS::Lambda::Function
    Properties:
      Code:
        S3Bucket: aws-lambda-spring-boot2
        S3Key: !Ref s3BucketKey
      Description: The Lambda function
      FunctionName: !Ref functionName
      Handler: !Ref functionHandler
      MemorySize: 256
      Role: !GetAtt lambdaIAMRole.Arn
      Runtime: java11

  lambdaApiGatewayInvoke:
    Type: AWS::Lambda::Permission
    DependsOn:
      - apiGateway
      - lambdaFunction
    Properties:
      Action: lambda:InvokeFunction
      FunctionName: !Ref lambdaFunction
      Principal: apigateway.amazonaws.com
      SourceArn: !Sub arn:aws:execute-api:${AWS::Region}:${AWS::AccountId}:${apiGateway}/*/*/*

  lambdaIAMRole:
    Type: AWS::IAM::Role
    Properties:
      AssumeRolePolicyDocument:
        Version: 2012-10-17
        Statement:
          - Action:
              - sts:AssumeRole
            Effect: Allow
            Principal:
              Service:
                - lambda.amazonaws.com
      Policies:
        - PolicyDocument:
            Version: 2012-10-17
            Statement:
              - Action:
                  - logs:CreateLogGroup
                  - logs:CreateLogStream
                  - logs:PutLogEvents
                Effect: Allow
                Resource:
                  - !Sub arn:aws:logs:${AWS::Region}:${AWS::AccountId}:log-group:/aws/lambda/${functionName}:*
          PolicyName: lambda

  lambdaLogGroup:
    Type: AWS::Logs::LogGroup
    Properties:
      LogGroupName: !Sub /aws/lambda/${functionName}
      RetentionInDays: 90

Outputs:
  apiGatewayInvokeURL:
    Value: !Sub https://${apiGateway}.execute-api.${AWS::Region}.amazonaws.com/${apiGatewayStageName}
I don’t really want to go into detail on the CloudFormation template because if you’ve worked with API Gateway and Lambda, it’s going to be easy to understand for sure.
For deploying the CloudFormation template, you can also use AWS console and pass over the necessary parameters, but I’ll use AWS CLI for now. I’ll use the same stack with different parameters to deploy the plain Java version of the lambda and the Spring Boot version of the lambda.
Although we’ll need one manual step in the process, creating the S3 bucket where the JARs will be uploaded. I’ve created it via the console and named it aws-lambda-spring-boot2 bucket.
Here’s the deploy script:
# Plain Java stack
aws s3 cp plainjava/build/libs/plainjava-0.0.1-SNAPSHOT-all.jar s3://aws-lambda-spring-boot2/plainjava-0.0.1-SNAPSHOT-all.jar
aws cloudformation deploy --template-file stack.yml --stack-name aws-lambda-plain-java-stack --capabilities CAPABILITY_NAMED_IAM \
  --parameter-overrides \
  apiGatewayName=aws-lambda-plainjava-api \
  functionName=aws-lambda-plain-java-function \
  functionHandler=com.arnoldgalovics.blog.LambdaHandler \
  s3BucketKey=plainjava-0.0.1-SNAPSHOT-all.jar
aws cloudformation describe-stacks --stack-name aws-lambda-plain-java-stack --query "Stacks[0].Outputs" --output json

# Spring Boot 2 stack
aws s3 cp springboot2/build/libs/springboot2-0.0.1-SNAPSHOT-all.jar s3://aws-lambda-spring-boot2/springboot2-0.0.1-SNAPSHOT-all.jar
aws cloudformation deploy --template-file stack.yml --stack-name aws-lambda-spring-boot2-stack --capabilities CAPABILITY_NAMED_IAM \
  --parameter-overrides \
  apiGatewayName=aws-lambda-springboot2-api \
  functionName=aws-lambda-spring-boot2-function \
  functionHandler=com.arnoldgalovics.blog.LambdaHandler \
  s3BucketKey=springboot2-0.0.1-SNAPSHOT-all.jar
aws cloudformation describe-stacks --stack-name aws-lambda-spring-boot2-stack --query "Stacks[0].Outputs" --output json
The script will deploy 2 CloudFormation stacks respectively and print out the public API Gateway endpoints that can be invoked, like this:
$ ./deploy.sh
upload: plainjava\build\libs\plainjava-0.0.1-SNAPSHOT-all.jar to s3://aws-lambda-spring-boot2/plainjava-0.0.1-SNAPSHOT-all.jar

Waiting for changeset to be created..
Waiting for stack create/update to complete
Successfully created/updated stack - aws-lambda-plain-java-stack
[
    {
        "OutputKey": "apiGatewayInvokeURL",
        "OutputValue": "https://c7e4hd5w65.execute-api.eu-central-1.amazonaws.com/dev"
    }
]

upload: springboot2\build\libs\springboot2-0.0.1-SNAPSHOT-all.jar to s3://aws-lambda-spring-boot2/springboot2-0.0.1-SNAPSHOT-all.jar

Waiting for changeset to be created..
Waiting for stack create/update to complete
Successfully created/updated stack - aws-lambda-spring-boot2-stack
[
    {
        "OutputKey": "apiGatewayInvokeURL",
        "OutputValue": "https://ufayx845ej.execute-api.eu-central-1.amazonaws.com/dev"
    }
]
Of course make sure to build the lambda function JARs beforehand, I’ve used this command:
$ ./gradlew clean shadowJar
The performance
Now let’s check out how the lambda functions are performing upon invocation. I’ve made several tests to come up with an average latency. Here are the results:
Let me summarize the chart. When the lambda is invoked the first time – cold start – for a relatively small packaged Java function takes around 800ms to respond. When the same happens to a Spring Boot lambda, it takes around 7500ms to respond. This can be scary but as soon as the first startup (and the context initialization) is done for the Spring Boot lambda, it almost achieves the same performance as the plain Java lambda. It responds in around 25ms while the other version does the same in 20ms.
Considering the rich feature set Spring provides – that I haven’t used in the example – if you can keep your lambda functions warm, I think it’s definitely an option to use. If you’re a Spring fan, and you like the easy configuration, probably it’s okay to take this few extra millisec added latency and save time on development and maintenance. Of course I’m not suggesting that you should use it in a very low-latency environment, but if that’s the case, generally speaking Java is not the best option out there for this use-case.
Conclusion
As always, choosing the technology for a particular use-case is a trade-off, and shall be evaluated based on pros and cons. Often for APIs we don’t really care about an added 5-10ms latency, so in my opinion it’s safe to use Spring Boot for even serverless computing, however you have to keep in mind that these lambda functions shall be kept warm to provide a consistent response time.
You can find the full code on GitHub, and make sure to follow me on Twitter for more content.