If you’ve ever been to a developer interview in your life, you must’ve heard the question. How much test coverage is acceptable?
Some people immedately say 100%, some say 90% and it ultimately stops at like 50%. For some reason that’s the lowest number I heard so far.
I’ll try to break down the topic from my point of view and share my ideas along the way. Let’s start.
The multi-layered question
Have you ever been in this conversation with a fellow engineer?
- Dude 1: We need to start this very exciting, cutting-edge project.
- Dude 2: Cool.
- Dude 1: Do you think we should use Java/Scala/Node.js/whatever for it?
In a sense, the programming language question is similar to the test coverage question. There are certain aspects to it, it’s not a single answered question – unless you talk about the details.
Test coverage is a term that’s applicable to multiple things:
- Unit test coverage
- Component test coverage
- Integration test coverage
- API test coverage
- UI test coverage
- E2E test coverage
- Performance test coverage
When someone asks this question, the first thing is to make sure we’re talking the same language. The most frequent choice is to go with unit test coverage – at least in my experience.
Now that’s decided. The next thing to talk about is the different ways to measure unit test coverage:
- Line coverage
- Branch coverage
Line coverage is when you measure which lines are covered within the tests. Branch coverage is when you measure which execution paths are covered within the tests.
Probably you’re like “what the hell is this guy talking about, that’s no explanation at all”. Agreed, it’s a very dry explanation so let me give you an example.
Assume we have the following (Java) code:
public void bar(int x) {
    if (x > 10)
        System.out.println(x);
}
In this particular method we have 2 lines that can be executed and 2 branches. One when x is greater than 10, and one – which is a hidden branch – when it’s smaller or equal. In the latter case, there will be nothing printed to the console.
Let’s have a simple test case.
class FooTest {
    @Test
    public void barTest() {
        new Foo().bar(11);
    }
}
We’re testing agains the input 11. In that execution path, the if condition will evaluate to true and the value will be printed to the console.
How does our metric look like?
- Line coverage: 2/2 (100%)
- Branch coverage: 1/2 (50%)
As you can see, if you’d just blindly look at line coverage, you’d have the safest feeling in the world; “my code is fully tested”. While looking at the branch coverage, it’s clear there’s a missing execution path.
That’s the difference between those 2 basic metrics and that’s why the answer to the original question is not black or white.
So how much?
I feel like less experienced developers and interviewers are expecting the answer to the “how much” question to be very close to 100%. I personally don’t think that’s right though.
The sole reason people think the higher test coverage the better the code is because they think there’s a direct proportionality between the 2. They couldn’t be far from the truth.
Often when testing comes to a discussion, we tend to forget testing has a cost. And it’s not even a one-time cost because tests need to be maintained. Even going further, comparing black-box testing and white-box testing has different maintenance costs.
Let me give you a brief overview of what I mean – and the definitions won’t be 100% accurate but you’ll get the idea.
Black box unit testing is when you don’t care about the internal implementation of your testable unit. You provide an input and based on the requirements, you verify the behavior against an output.
Assume the following code:
public class Foo {
    public int bar(int x) {
        if (x > 10) {
            return x + 1;
        }
        return x;
    }
}
The related test case:
class FooTest {
    @Test
    public void barTest() {
        Foo foo = new Foo();
        int result = foo.bar(11);
        assertEquals(12, result);
    }
}
This is a black box test. Why? Because I invoked the bar method with the input 11 and I expected 12 in return. This way I verified whether the implementation of Foo#bar was done in accordance to the requirements – where the requirement in this imaginary case was to increment x by 1 in case it’s greater than 10, leave it as it is if not.
As you can see, if the requirement change that I need to increment x by 2 in case it’s greater than 10, I can easily do that and change the test. No big deal. And the test eventually will represent the actual requirement of the unit. Awesome.
White-box testing on the other hand is when you verify the implementation of your unit.
Previous example with a small change:
public class Foo {
    private ParamCreator paramCreator;
    private Calculator calculator;

    public Foo(ParamCreator paramCreator, Calculator calculator) {
        // omitted
    }

    public int bar(int x) {
        if (x > 10) {
            CalculatorParam param = paramCreator.create(x, 1);
            return calculator.add(param);
        }
        return x;
    }
}
The change I’ve made is, extracting the calculation logic into a Calculator class and having the ParamCreator class to create a parameter object for the calculator.
We know the drill. To ensure testing only a single unit on unit testing level, I’ll use mocks.
@ExtendWith(MockitoExtension.class)
class FooTest {
    @Mock
    private ParamCreator paramCreator;

    @Mock
    private Calculator calculator;

    @InjectMocks
    private Foo foo;

    @Test
    public void barTest() {
        CalculatorParam calculatorParam = new CalculatorParam(11, 1);
        Mockito.when(paramCreator.create(11, 1)).thenReturn(calculatorParam);
        Mockito.when(calculator.add(calculatorParam)).thenReturn(12);

        int result = foo.bar(11);

        assertEquals(12, result);
        Mockito.verify(paramCreator).create(11, 1);
        Mockito.verify(calculator).add(calculatorParam);
    }
}
Creating the mocks, injecting it into Foo, that’s it. The test case though gets complicated. In order to make sure the mocks are behaving properly we have to know the implementation exactly. The first part of the test contains the setup, when I’m consturcting the mock behavior based on the parameters of the method calls. Then invoking the bar method and then verifying the result – which was returned from a mock; as well as verifying the mocks that they’ve been really called.
Back to white-box testing. When you’re using mocks in your tests, you’re essentially doing white-box testing. One of the key disadvantages in my opinion is the amount of coupling it brings.
Imagine I’d like to change the code and create the parameter object within the Foo class. The above test scenario will fail because the ParamCreator was not called at all (Mockito.verify(paramCreator).create(11, 1);).
The ROI
With black-box and white-box testing, you get a different ratecard. With black-box testing maintenance is much easier. You change the behavior, you pay the price for changing the behavior in the tests. With white-box testing, you change the implementation, the tests need to be rewritten even though the behavior might not change at all.
Plus, there’s this tiny little idea, called “meaningful tests”. Everybody can write tests to make sure the code coverage is 100%. But the question is, out of that 100%, how much is meaningful? That’s another very interesting metric.
Measuring meaningful tests is a whole other topic I won’t go into right now – maybe in an upcoming article. In my opinion there’s no silver bullet to that and probably not even a de-facto tool to do such measurements but the closest idea is mutation testing.
Let’s talk a little about ROI, the concept every single developer, QA engineer should know, Return On Investment. In simple words, it’s like what do I get in return for something. Here’s a general ROI chart of automated testing.
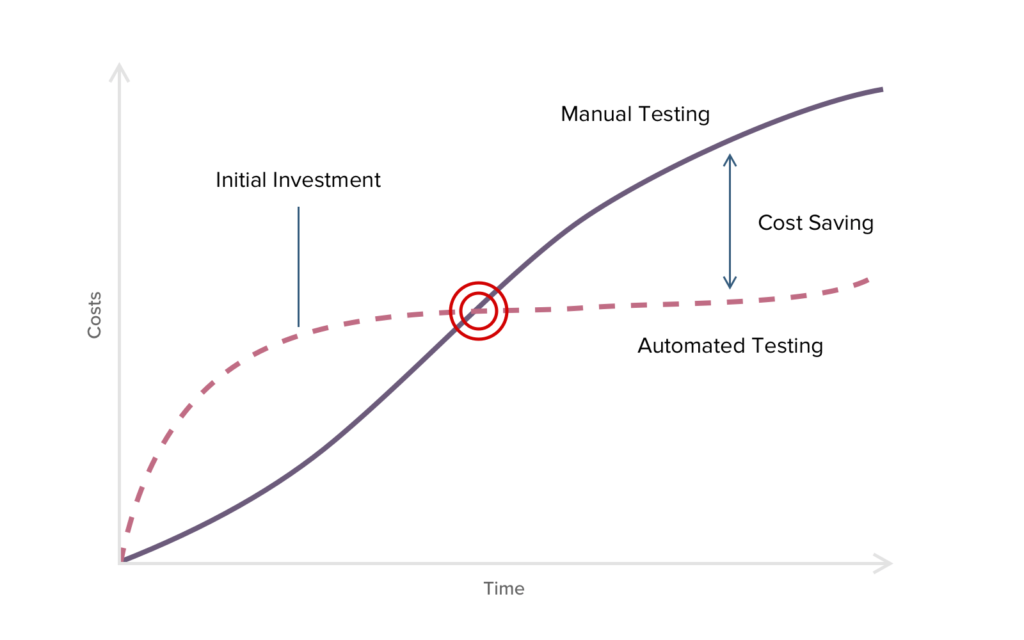
For automated testing, you’re investing your time initially to win time in return which you’d consume by manually testing every time.
I honestly think this chart is an oversimplification of the problem space. When one expects the value to come back in the second half of the chart, they by default assume the tests are maintained at zero cost.
I bet you’ve had a chat with your manager before arguing about why do tests need to be changed again because of a refactor (khm, white-box testing). Or what if the tests are not meaningful and you get the false safety feeling that everything is fine.
The answer
The answer to the original question depends on a lot of factors. There are properties of the tests as I said but what about the specific environment you’re dealing with?
Do we need to write the same amount of tests for a Netflix-like product? Or for an internal tool which only 5 people from HR is using? Or for a local grocery shop’s website?
Obviously everything depends. For example is it worth writing tests for a product that’s lacking a lot of test scenarios but it’s getting discontinued in the next 6 months?
No silver bullet here either. I just hate when people are insisting on 90-100% test coverage when there’s much more to that question. If you ask me, the best answer is a series of other questions like what is the environment we’re talking about, what is the project schedule, how big is the client, how long we need to support the product and explain the importance of writing meaningful tests and properly using the code coverage metrics.
Considering all this, I have a discussion starter rule of 60% meaningful test coverage, I usually don’t like going under it but I’ve seen projects work like charm with 30-40% coverage as well. Of course the number will depend a lot on the environmental factors.
If you have any thoughts about the topic, feel free to share here in comments or tweet me. In the meantime, follow me on Twitter and Facebook for new posts, trainings and other exciting stuff.